With One Stop Order Processing you can import orders and manage your products
from various selling platforms or create your own orders and products. You can
select multiple orders, using your selection criteria, quickly and easily take
them through to completion.
You can integrate with other 3rd party systems using the order export features
and allow your orders to be tracked online (using the built-in order tracking
(hosted on your website). Integration with Courier systems is also supplied
(e.g. UKMail). You can export order and product information
to accounting systems.
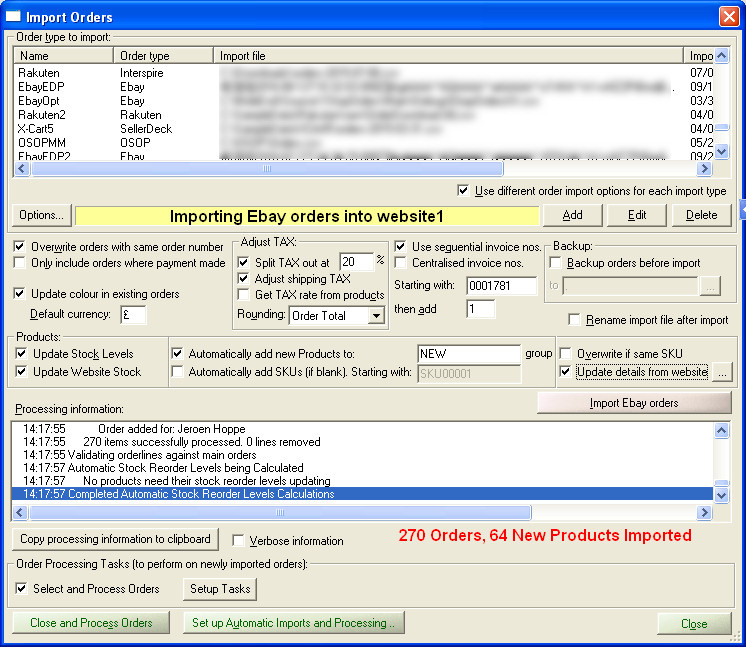
You can easily import your orders into One Stop Order Processing. Click on
the Import Orders button (![]() ). When you import orders you can choose to automatically import the product
details into the inventory system. You can then manage your stock and produce
details reports based on your products (e.g. Total Sales or Profit).
). When you import orders you can choose to automatically import the product
details into the inventory system. You can then manage your stock and produce
details reports based on your products (e.g. Total Sales or Profit).
The first time that you start One Stop Order Processing you are shown the One Stop Order Processing Quick Setup Wizard. This allows you to enter the basic information required to get you started. You can re-run the Wizard at any time or include more detailed information in the Options. You are also shown the wizard whenever a new site is created.
If you accept telephone orders, mail orders or want to enter manual orders
click on the New Order button (![]() ).
).
If you want to create a new order that is a repeat order (a copy) of another order, select the order and click the right mouse button and select the first option, Generate Repeat Order (
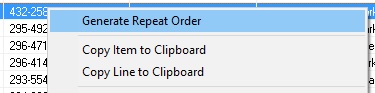 ).
).
You can change any order imported into One Stop Order Processing. For example, if you want to change a customer's address, items ordered or add notes. To amend (or view) an order double click on the order in the list of orders.
Changing orders details on the main Order List (This feature is available in Professional, Premium and Enterprise versions of One Stop Order Processing)
If you are using Professional (or higher) you can edit an order in the main view. To do this click the value to amend and press F2 or right click the mouse and select the Edit Item menu option. When you edit items you can also assign a list of values to the field, which can be useful for selecting fixed values (e.g. Courier). For more information on setting up lists see the List Manager Section . When you are amending an order you can choose to change the value for the current field or the same field in all the selected or ticked orders. This is shown below:

This can be very useful if you need to set the value for a large amount of orders (or linked product details).
You can create a refund (or credit note) for an order by select the Edit->Issue
Refund menu option or right clicking on an order, right click the order and
selecting the Issue Refund menu option. For more details see the Refund
details.
If you want to merge multiple orders into a single order to reduce shipping costs or produce a consolidated invoice select the relevant orders and select the Combine option. For more details see Combining orders
If a customer wants to cancel an order you can select the order and select the cancel option (either use the Edit->Cancel Order menu option or use the right mouse button and select the Cancel Order option). Cancelled orders have a no entry icon ( ).
).
If you need to hold an order while checks are made, you can select the Hold option. Yo do this select the Edit->Hold Order menu option or use the right mouse button on an order and select the Hold Order menu option.Held orders have a question mark icon (![]() )
)
Once an order has been shipped you can't Hold or Cancel an order.
You can use the Status filter to only show cancelled and held orders or not to show them.
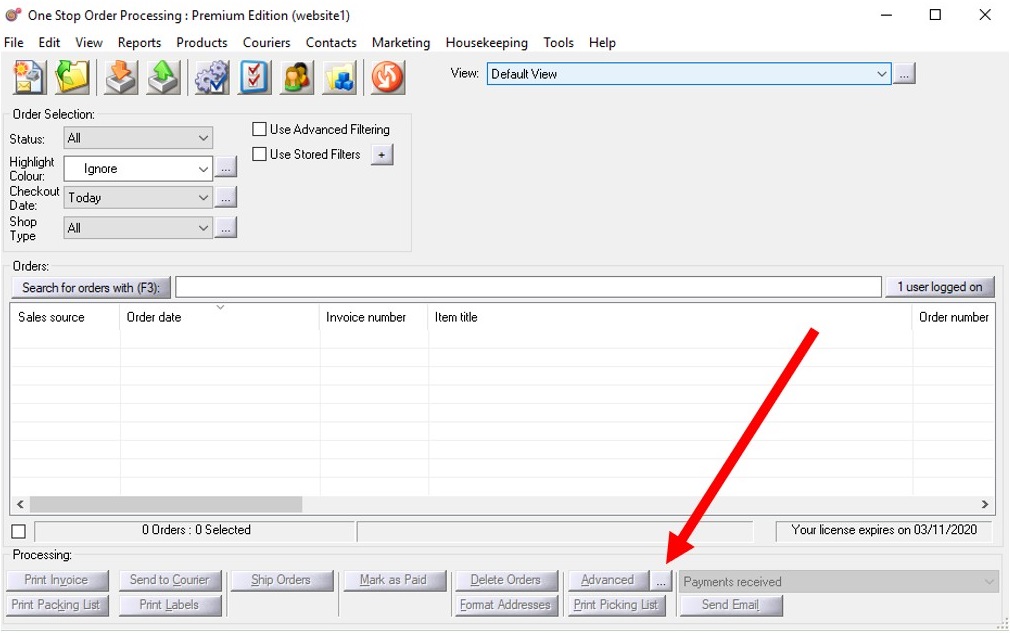
You can select which orders to show based upon a variety of ways, for example,
when the order was placed.
Status
This can be set to show orders only certain orders:
. Not shipped
. Paid and not shipped
. Paid and shipped (A complete order)
. Shipped
. Not paid or not shipped (And uncomplete order)
. Unpaid
. All orders
. Cancelled or On Hold
Highlight Colour
You can assign colours to specific orders. You can then choose to only show
orders with a certain colour assigned to it. Each colour can be assigned a specific
task (or order state) to fit in with how you run a shop. For example, if 3 different
people process orders, each order handled by that person can be assigned their
colour. Each user, on a different system can choose to only display their orders.
You may also choose to use the colour red to signify an order from an important
customer or to validate the customer’s delivery address (if a PO Box has
been entered as the delivery address).
NOTE: You can create up to 26 different colours, each having their own
name. To do this press the ![]() button
to the right of the Highlight Colour Filter.
button
to the right of the Highlight Colour Filter.
Date
You can use a master date filter to only show orders within a certain date range.
The date range here can be used in addition to the main filtering. This selection
is also independent of which view you are using. This can be very useful for
when you have a large number of orders. You can set this to show only the last
30 (or 60 or 90) days orders. You can also change the available date periods
to show orders from by pressing the  button to the right
of the Date area. This displays the following dialog:
button to the right
of the Date area. This displays the following dialog:
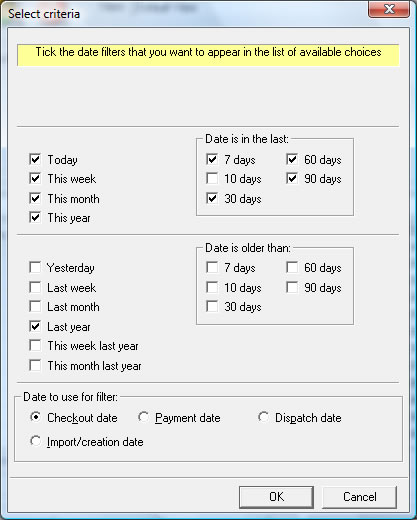
You can also choose which date to use for the master filtering.
Checkout date
The date that the customer placed the order
Payment date
The date that the order paid for
Dispatch date
The date that the order was shipped
Import/creation date
The date and time that the order was imported into One Stop Order Processing.
This is also the creation date of the order if it was manually entered.
NOTE: This date type is shown on the main screen next to the date filter (so that you can see which date is being used for filtering).
Shop Type / Sales Name
You can show orders from all of your shops (e.g. Ebay and Amazon) or a specific
Shop Type orq Sales Name (the name of the import type used). This allows you to manage all of your orders from different shops
or imports in a single website.
NOTE : To change from filtering by Shop Type to Sales Name click on the to the right of this filter option.
Once the list of orders has been displayed you select the orders to process
by checking (ticking) the order to the left of the order.
You can only use filters on the Custom values that allow values to be entered.
Filtering will be done on the values entered for that particular field (not
including the default value).
Advanced Filtering
A filter is based upon one of the currently shown columns. To create a filter
do the following:
1. Choose a Field type, for example, Checkout date.
2. Select the Criteria, for example Between.
3. Enter values for the chosen criteria, for example 9am on the 10th July 2007
and 5pm on the 30th July 2007.
4. Press the Refresh button ( ![]() ).
).
NOTE: You can also refresh orders by pressing the F5 button.
Instant Filtering - Showing orders based upon currently selected order
If you select an order and click on the right mouse button you can select a filter to show orders based upon the selected information. The options available are:
Date values
Filter order list on dates equal to this date
Filter order list on dates equal to or before this date
Filter order list on dates equal to or after this date
Numbers and costs (prices)
Filter order list on items equal to this value
Filter order list on items less than or equal to this value
Filter order list on items greater than or equal to this value
Text (string)
Filter order list on items equal to this value
Inline filtering
Inline filtering allows you to filter on each header to a value of your choice. This will allow you to find orders easily based on your needs. The steps below will explain how to use the inline filtering feature.
This feature is available in the Premium subscription of One Stop Order Processing.
The following steps will explain how to use our One Stop Order Processing feature.
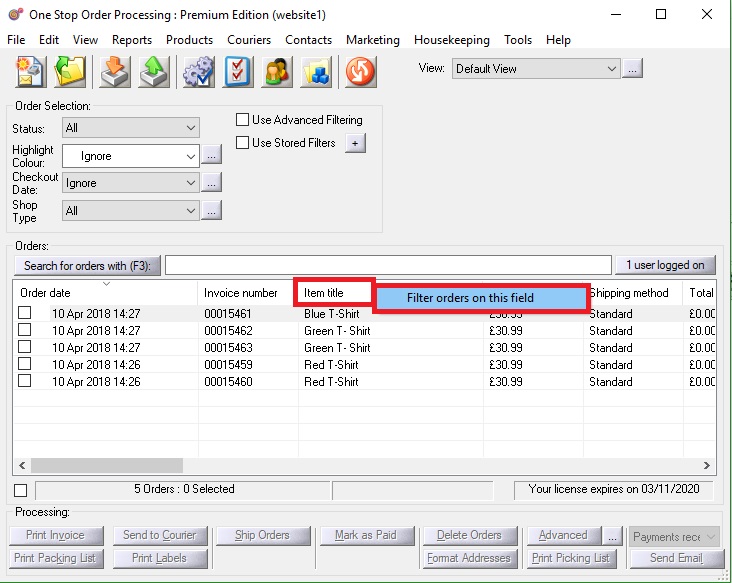

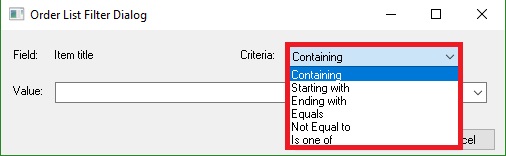
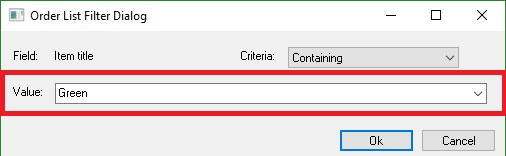
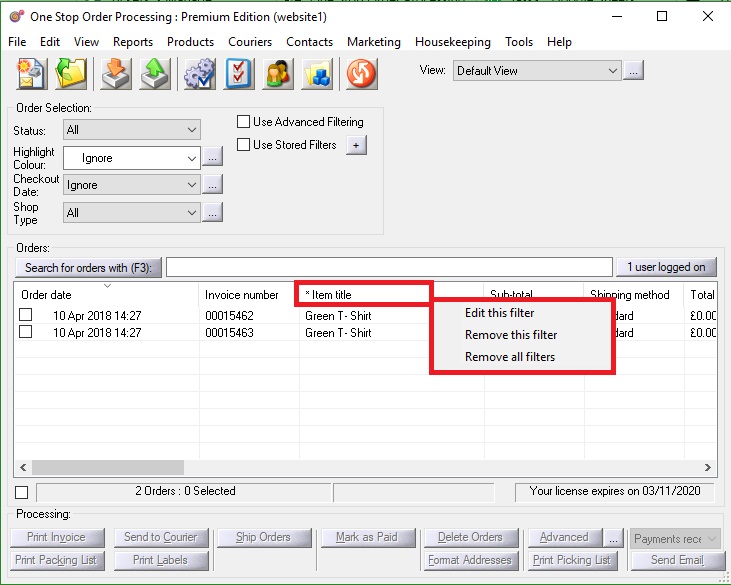
To note - a '*' will show in the field header to show that inline filtering has been put on this field, if you right click again on the header it will provide the option to remove or edit the filter.
More filtering options
There are several useful filtering features that can make searching
for groups of items very easy. You can use 1 of 2 methods:
1. When searching for text items (e.g. Customer), you can select the Criteria Is one of. You can then type in a list of name separated by a comma (e.g. Brown,Smith,Jones). This will then produce a list of all the named people (in this case Brown, Smith and Jones).
2. Get the filtering values from a file. If you type in !! followed by a filename
(for example, !!C:\temp\filtervals.txt) the filter uses the value in the file.
This can either be a single word, number etc. or it can use a list of values
(as described in method 1). If you are using multiple items they can appear
as a comma separated list or have a new item to search for on a separate line
of the file.
Stored Filters (This feature is available in Professional, Premium and Enterprise versions of One Stop Order Processing)
When you have setup a filter to show specific orders you can store it to use later. This filter can easily be used for specific tasks. To create a filter click othe + button next user Stored Filters. To use a Stored Filter tick the box next to Use Stored Filters. This allows you to use a setup filter.
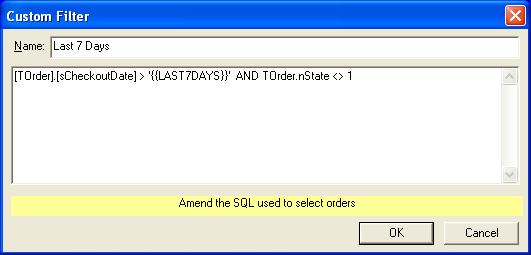
When you add (or amend) a filter you are shown the filter definition (SQL) used to show the orders. You can amend this to include more order filtering details. More details are explained in the Advanced Users Guide. When you are using filters that require dates in ranges (e.g. last 7 days) you should use one of the following macros (so that the date is selected each time the filter is run).
{{LAST1DAYS}}
{{LAST2DAYS}}
{{LAST3DAYS}}
{{LAST7DAYS}}
{{LAST10DAYS}}
{{LAST30DAYS}}
{{LAST60DAYS}}
{{LAST90DAYS}}
{{LAST_MONTH}}
NOTE: When you create a filter you can give it a name and also amend the SQL used. You can also use the filters when calling One Stop Order Processing from the command line (see One Stop Order Processing Batch Options for more information).
You can easily find orders that contain certain text. If you enter text into the Search for orders with (F3) button all fields of all the currently displayed orders are searched. This can be very useful if someone telephones you and says their name or company but you don’t know which field they entered the values into. Every time you search for text it searches from the currently selected line. If the end of the orders list is passed the start of the orders list is searched. If no orders are found that contain the text a message is displayed. When an order is found that matches your text is automatically checked (ticked).
NOTE: After entering your text you can also press F3 to find the text.
More searching options
You can get the value to find from a file. If you type in !! followed by a filename (for example, !!C:\temp\findval.txt) the filter uses the value in the file. This can either be a single word, number etc..
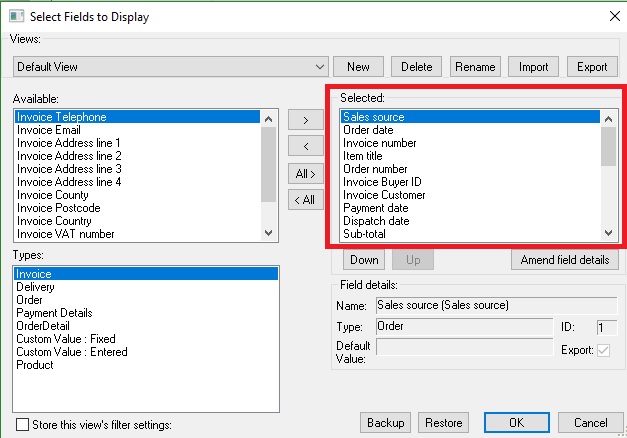
A view is group of fields to display the order information by. There are several
pre-defined views, each displaying the appropriate fields for a given task.
You can modify these views or create additional ones by pressing the Customize
view button ( ).
).
Several views are installed. These include Courier views (that allow your order
details to easily be imported into external Courier systems).
When using One Stop Order Processing items can take up multiple lines in your order view, this is because the view has fields with item details in.
Why are my orders showing on more than one line?
How to prevent orders being on more than one line-
1.Click the Customize Current View Button (The clipboard with the 2 ticks)
![]()
2. Go to the Selected: box
3.Select any fields to do with item details (E.g. Item weight)
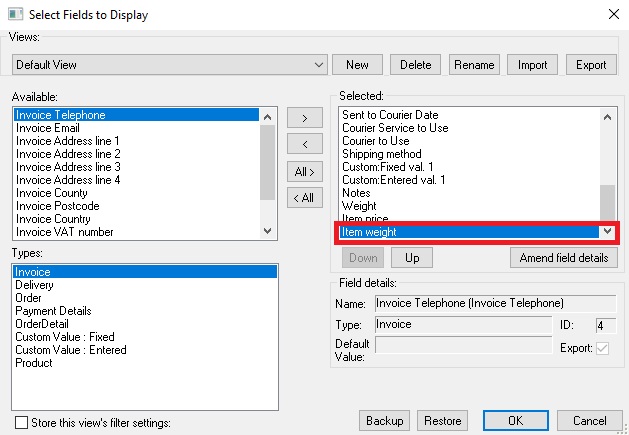
4.Click the arrow pointing to the left

5.Once you have done this for all the item detail fields click OK and refresh the page by click F5.
However, if you still need some of the item details in the view to help you process orders then you can highlight the orders with more than one item so hey can easily be identified as being from the same order.
1.Click the ... next to the Advanced button
2.Click Add
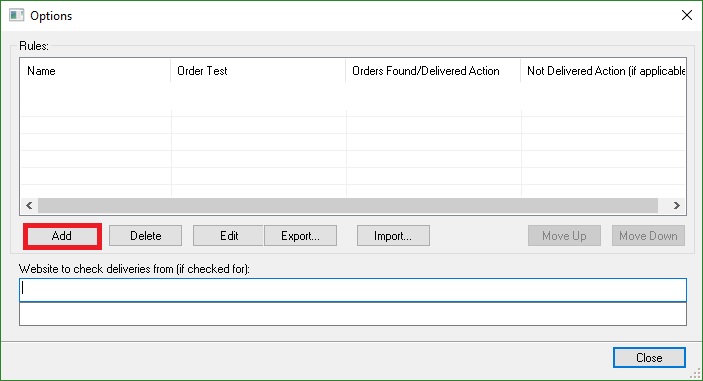
3.Name the Rule
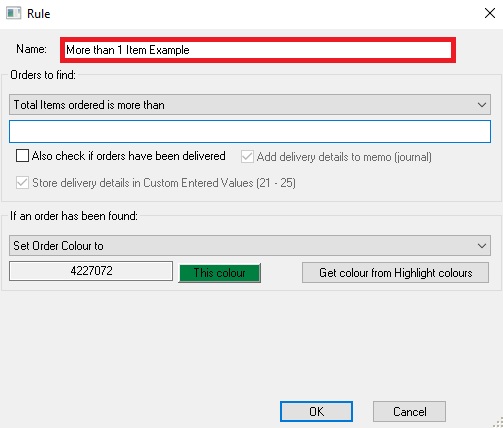
4.From the first drop-down menu select Total Items ordered is more than
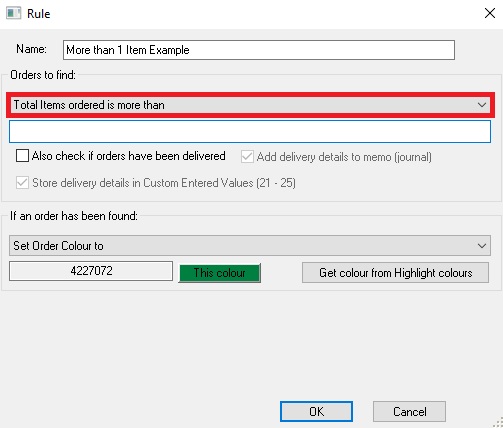
5.Type 1 into the field below
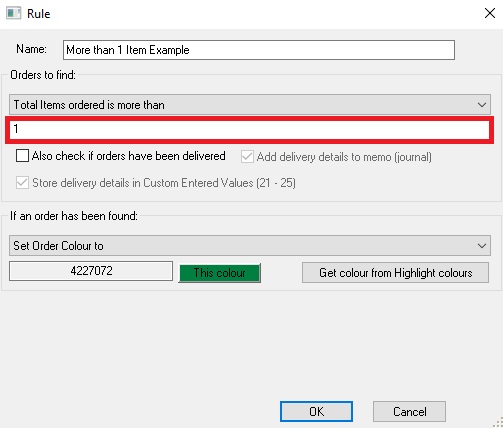
6.From the second drop-down menu select Set Order Colour to

7.Choose an appropriate colour.
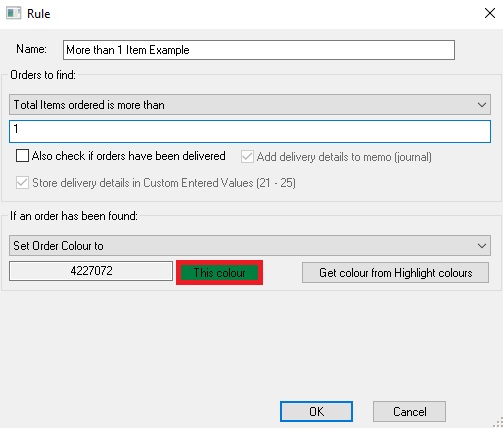
8.Click OK
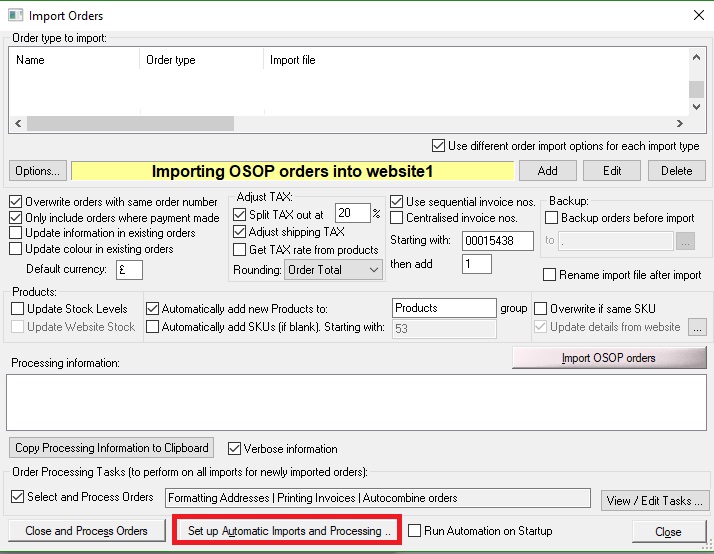
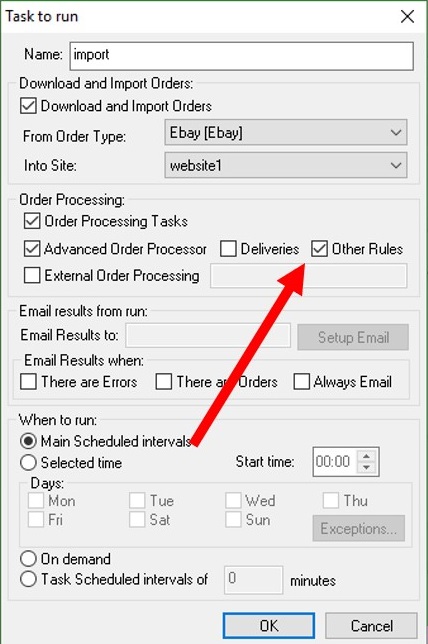
Highlight orders automatically on import
9.Click Set up Automatic Import and Processing..
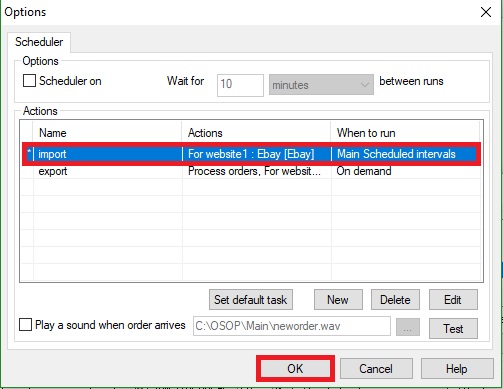
10.Click Options

11.Double Click one of your options from the Actions
12.Tick Advanced Order Processing
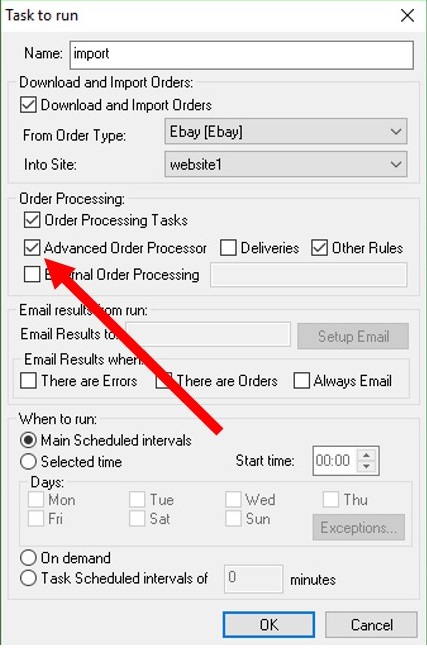
13. Tick Other Rules
To test this rule-
1. Tick all Orders
2. Click 'Advanced' button
 ).
Each product can up to 3 different suppliers.
).
Each product can up to 3 different suppliers.  ).
You can also use the Contacts->Customers->Manage menu option. The customer
browser is also shown when you use create orders (and use the Find button).
).
You can also use the Contacts->Customers->Manage menu option. The customer
browser is also shown when you use create orders (and use the Find button).
You can Export Order Details to other 3rd party
systems including
Amazon Shipping Confirmation
Ebay Shipping Confirmation
RoyalMail SmartStamp
RoyalMail Despatch Express
UKMail Consignor
QuickBooks
QuickBooks Self Employed
Sage
SageOne
KashFlow
Xero
Post Office Proof of Posting
Royal Mail Depsatch Manager Online (DMO)
ParcelForce (WDMO Online)
MetaPack
RoyalMail Click and Drop
Automatically exporting orders to RoyalMail Click and Drop
NOTE: If you are using Professional you can send the details directly to the couriers using the Courier Options.
Once order tracking has been setup (see the Track Online options for more information) you can select ¦any of your orders and upload their tracking information to your website. Customers can be sent an email which will automatically include a link to their order tracking information (on your website) and/or they can use an order tracking box on your website, where they type in their order number. You can then update (and upload) their tracking details to notify your customers of the order process.
You can change the information to display in the online tracking form. You
can include details about the order and include up to 50 additional custom values
specific to your business. This can include fields for you to add in comments
or batch numbers or courier tracking, who packed by etc.. You can also configure
the tracking options.
If you right click (with the mouse) while on an order an additional menu is displayed. This provides the following features:
Auto totaling
If the field contains a numeric value (e.g. order total) all of the currently
displayed orders’ values will be added up and displayed. If there are any
checked (ticked) orders these are also added up. This can be useful if you want
to find the total of certain order values from all of those displayed.
Copying information to the clipboard
If you want to easily export information to another application (e.g. Microsoft
Word) you can right click (on the mouse) on an order and either copy the current
item or the entire line to the clipboard. This can then be pasted into any other
application.
NOTE: This option is only available if a single order has been selected
Checking and Unchecking selected orders
If you select more than 1 order you can choose to check or uncheck all of the
selected orders.
You can display the current order details in any of the following ways.
Double clicking the mouse on an order.
Select an order and right click (on the mouse) and select the Show Order Details
option.
NOTE: Only 1 person can edit an order at a time. While an order is being
edited it can still be viewed by other users. You are prevented from editing
an order if someone else is editing the order. If you have the ‘Allow locked
orders to be changed’ option enabled (in the Setup
Available Features dialog) you can override the other person editing an
order. However, this will then prevent the other user from saving their changes.
In practice, if this situation arises you should either talk to the person or
send them a message (using the logged on users dialog from the main dialog).
Each order is made up of the following pages:
Customer details
Items ordered
Shipping
Memo
Order custom values
You can see which other computers (users) are current using One Stop Order
Processing. You can also send messages to them when any order issues arise.
To do this press the Logged on Users button.
If you want to print the current orders as they are shown select the Print Order View menu option (under File->Print menu option). If you have specific orders selected you will be prompted to see if you only want those orders printed or all the orders matching the current filter.
When you print the current orders, the current column widths and columns selected are used to print the report. If you want a report to contain certain information you should add that column to the current view (or create a specific view to print the order details).
If the orders printed are too large to fit onto a single page they are split over more than 1 page. When the report is printed the page number and its location in the report is printed on each page. For example, if a report is too wide for a single page and fits onto 2 pages and there are 2 pages of orders, the page details are printed as:
. Page 1 (Row 1 Column 1)
. Page 2 (Row 1 Column 2)
. Page 3 (Row 2 Column 1)
. Page 4 (Row 2 Column 2)
Using this information you can assemble the report as a single page.
When you print a report of the current orders any fields that contain numbers
or prices will be automatically added up and a total printed at the end of the
report. You can configure which columns are totaled by amending their details
in the Customise View dialog (press the Customize
view button ().
For each selected order you can print, preview, email the Invoice, Packing List or Purchase Order. All the selected orders can also be marked as shipped, have their addresses formatted or the order tracking details published to a website for order tracking. If you want to individually ship each item for an order (for example, if an order has 3 items and you only want to ship one of them), tick the 'Only include ticked order lines' option on the Display options. If you are using this approach the order will only be marked as shipped, and be given a shipping date when all the order lines are shipped.
You can communicate with your customers by sending them emails to tell them what stage their order is at. Several default templates are supplied. You can amend these or create your own. Emails can be sent as HTML or plain text.
NOTE: Html emails can not be sent if you are using a MAPI client (e.g. Outlook).
You should use an SMTP server for this. See the Setup
Email for more information on how to do this.
Advanced processing (This feature is available in Professional, Premium and Enterprise versions of One Stop Order Processing)
If you want more advanced processing tasks, for example, to mark orders red if they are for Expedited shipping and they are sold on Amazon, you can use this option. click on the ![]() button to the right of the Advanced button. This will display the Advanced Order Processing rules. You can define multiple rules to perform on the selected (ticked orders). For more information on how to setup rules see the Advanced Order Processor
button to the right of the Advanced button. This will display the Advanced Order Processing rules. You can define multiple rules to perform on the selected (ticked orders). For more information on how to setup rules see the Advanced Order Processor
Order Display
Invoice, Packing List and Purchase Order Options
Shipping
Printing Fields
Emailing
Track Online
Formatting Address
Company Details
Report Options
Other Options
Courier Options
You can install and use One Stop Order Processing on up to 10 PCs at the same time.
NOTE: Each different PC used to connect to the same website (database) will need a separate license.
There are certain requirements (and limitations). These are described below:
1. All PCs must have the relevant security access to the main PC. If you do
not have the required access a message will be displayed by One Stop Order Processing
when selecting the remote site. You should consult your System Administrator
if you do not have remote access to the main PCs directory.
2. Ideally you should divide the orders to process across the remote machines.
If more than 1 person processes the same order changes made by one user may
overwrite changes from another.
Once the remote site has been selected One Stop Order Processing will continue
to use the selected site (i.e. you won’t need to re-select the site each
time that you start One Stop Order Processing).
Changing the site to process orders for
Setting up Email
Managing Assistant Messages
Managing Order Backups
Archiving Orders
Compacting and Repairing the Orders database
One Stop Order Processing Batch Options
Advanced Order Processor
Cancelling (or Holding) orders in batches