You use the Courier Rules to automatically select the appropriate courier and shipping service based upon the order details. You can setup very simple to very complex rules based upon how how you decide what couriers and services you use.
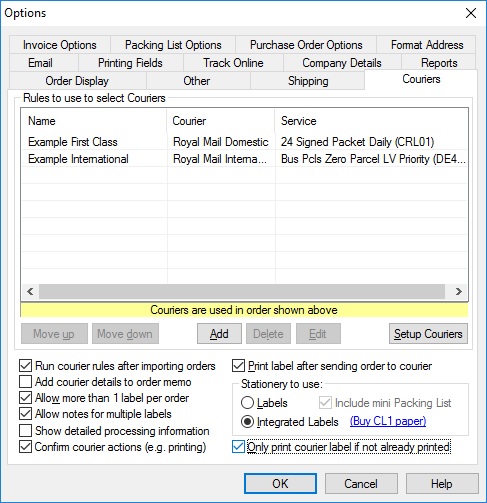
Rules to use to select Couriers
When you create rules you change the order in which they are processed. The first rule is run and if that is valid the defined Courier and Service is used. If not the next rule is used.
NOTE: If you set a Rule up with no conditions (or tests) the setup Courier and
Service will automatically be used. It can be useful to set this up as the last rule, to use as a default Courier and Service.
You add, change remove rules by using the Add, Delete and Edit buttons.
To change the order of rules setup use the Move up and Move down buttons.
Setting up Rules
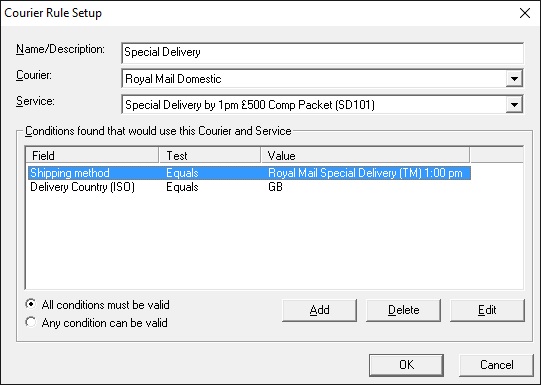
Each rule is made up of conditions. When the conditions are met (valid) the Courier and Service entered are used for the order.
If you have no conditions the Courier and Service is always used.
If you have more than 1 condition you can choose to
whether either has to be valid or all have to be valid.
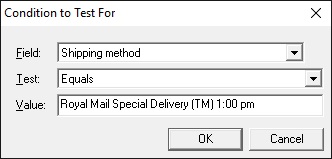
When you add (or amend) a condition you can select the field to use how to test the field and what value to test for.
Print label after sending order to courier
If this option is ticked the label is automatically printed to the printer setup for the appropriate courier (in the Setup Courier options).
Only print courier label if not already printed
To make sure you don't print the same label more than once tick this option.
Run courier rules after importing orders
If you want to setup the appropriate courier and service for orders as they are imported tick this option.
Add courier details to order memo
If you tick this option any details found when setting up the Courier and Service are added to the order's memo field (shown in the Order tab).
Allow more than 1 label per order
If this option is ticked you can create more than 1 label for each order. If this option is not ticked you are restricted from creating more than 1 label per order.
Allow notes for multiple labels
If you enter a second label (third etc.) you are shown a box that allows you to add a note to the order
Confirm courier actions (e.g. printing)
Before you perform any courier action on an order you are asked to confirm that you want to continue.
Stationery to use
Labels
You can print the courier laels directly to your Label printer. To do this select the printer to use for each courier (in the Courier Setup).
Include mini Packing List after label
If you want to print the items to pack for the order (in the form of a small packing list) onto a 6 by 4 label after the courier label tick this option.
NOTE: If you want to amend the mini Packing List you should amend the HTML template, PackingListMini.html, by default this is in the C:\OSOP\Main\Templates folder.
Integrated Labels (CL1)
You can print the 6 by 4 label onto the same paper as the invoice. This makes picking and packing quicker and less error prone. This is designed to use the CL1 Integrated Label paper, available from
https://1stoporders.co.uk/Integrated-Label-Invoice-Paper-for-One-Stop-Order-Processing.html
NOTE: If you want to amend the mini Packing List you should amend the HTML template, DispatchNoteCL.html, by default this is in the C:\OSOP\Main\Templates folder.
.
Setup Couriers
To be able to submit consignments to couriers you need to setup the details for your account
You are shown the details for each courier that you want to setup. Most of the details will be the same for each courier, for example, the default weights. However, each courier will have its own account number settings and maybe use a different printer.
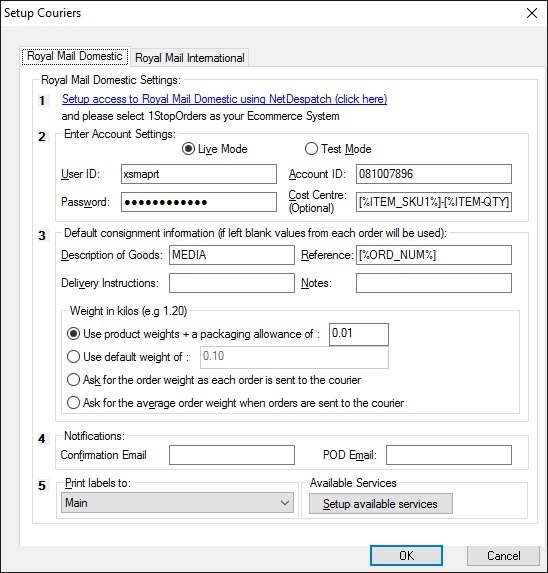
Each courier has 5 steps to enable the courier to be setup.
1 Setup the account with NetDespatch. A link is provided to create your account details. If you make sure you select 1StopOrders as your Ecommerce System
(so that they can setup your account to use our software correctly).
NOTE: NetDespatch do not charge you for using their services and your existing contract with the Courier is unaffected.
You can use Test Mode to create labels to see how the system works.
NOTE: You will not be able to use the labels created in Test Mode to send parcels.
2 Enter the account details emailed to you by NetDespatch. This will allow the consignments to be sent to the correct Courier account.
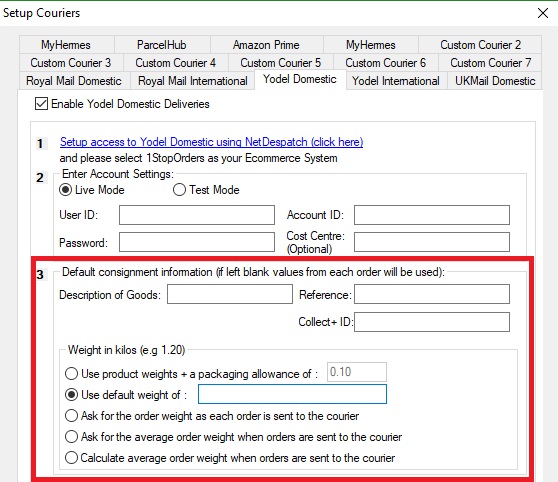
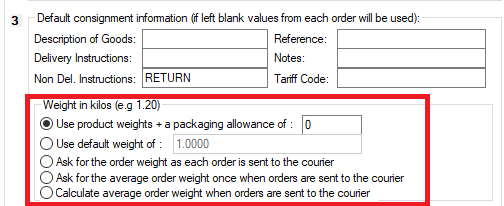
3 Default consignment information
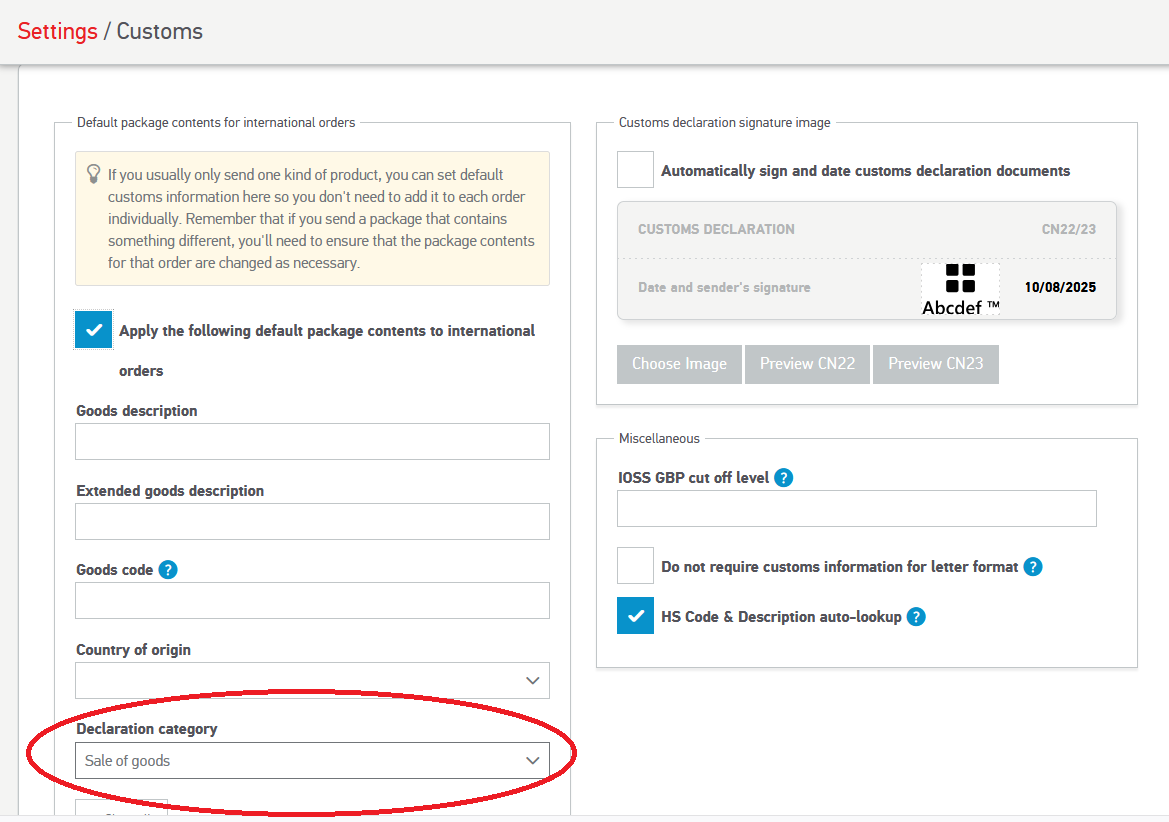
By default the order item details are used to sent to the courier (mainly for international orders). However, you can override these details by providing values in these fields. You can use macros and formulae in each of these fields if you want to use different values for each order (more details on the macros to use are in the Invoice, Packing List and Purchase Order Options).
You can use additional Macros to specify information for Royal Mail International Orders in the Description of Goods field, shown below. You simply add this to the Description of Goods field. These will be removed and not shown on the CN22 or CN23.
| Name | Description | Example |
| SIGNATURE | Name to show on CN22 and CN23. If this macro is not used the Company contact name used (in the Company options) | SIGNATURE={Bob Smythe} |
| HSTARIF | Tarif code to show on CN22 and CN23. If not included no tariff code is shown | HSTARIF={1212121} |
| QTY | Quantity of items included. If this is not included a quantity of 1 is used | QTY={[%TOTAL_ORDER_QTY%]} |
| TOTAL | Total amount paid for the order. By default this will be the total order cost, but if want a different figure or don't want to include shipping you can use macros. | TOTAL={#!#[%ORD_SUB_TOTAL%][+][%ORD_SUB_TOTAL_TAX%]#!#} This uses the total cost of items in the order and does not include any shipping charges |
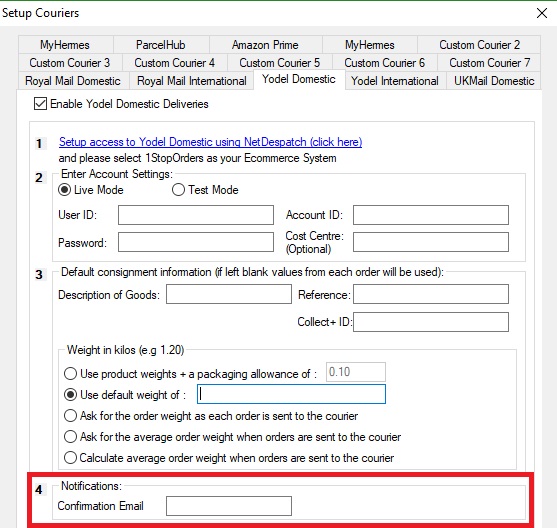
4 Notifications
You can be notified about each stage of the creation and delivery process your consignments. You can additionally turn the notifications option off in your NetDespatch account settings.
5 Print labels to
You can choose which printer to send the labels to. It will use the default paper and margins etc. for the selected printer (E.g. a 6 by 4 label printer). If you are using Integrated Labels select No Printer - Do not print.
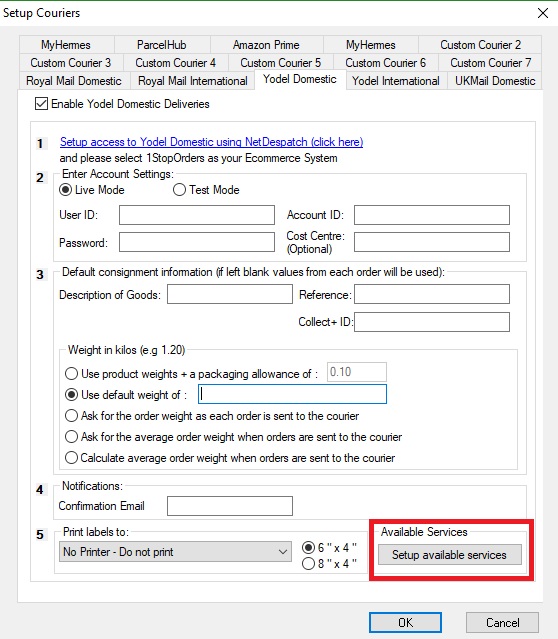
Available Services
By default, you are shown all the
available services for the selected courier. If you want to only show the couriers that have been setup with your Courier account click on the Setup available services button.
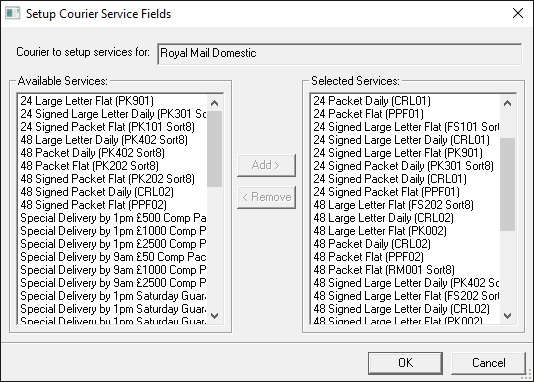
You can choose the services that you can select. Once correct click on the OK button.
What do I enter for an Ebay tracking number if I do not have a tracking number?
If you do not have a tracking number for Ebay you can enter a different valid value that can be used to access delivery information.
eBay says the following on tracking numbers:
"Note: Different carriers use different terms to mean 'tracking number'. They mean any number which can be used by you and your buyers to track an item."
The value should be unique and can be information that can be given to you to see how the parcel was sent. If a tracking number can not be used you can enter the order id as this can be used by you to find how the parcel was sent.
To set up One Stop Order Processing so that it uses a tracking number if one has been included with the order and if not use the order number put the following macro into the Default tracking No: field on the Shipping options tab (select Options by selecting the Tools->Options menu option).
[%ORDER_ID%]
Now when you import orders, the tracking ID will be set to the macro above, if you send the order to courier and receive a tracking number, the macro will be replaced with the tracking number OR you can also import tracking numbers from a file or manually add them by editing the order.
[%ORDER_ID%] will translate to the eBay transaction ID which will be unique and so satisfy eBay's requirement.
How to Generate Yodel Labels within One Stop Order Processing
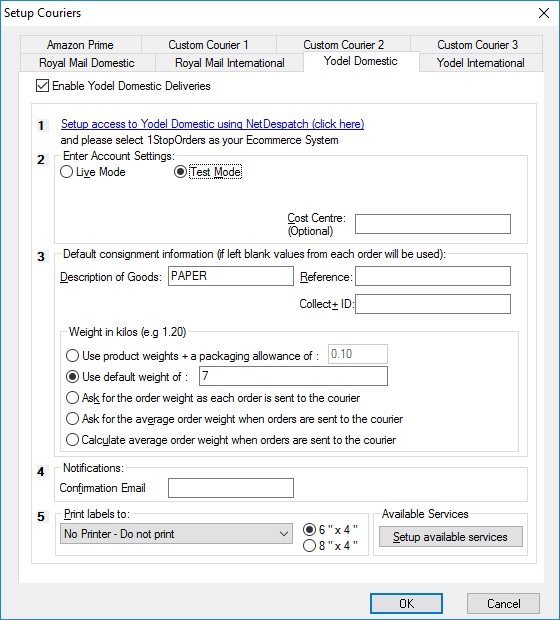
Test Mode
When testing and experimenting with generating courier labels it may be beneficial to use Test Mode. Test Mode allows you to trial different options without buying courier labels or entering your courier account credentials. You will be unable to send parcels until you are using live mode not test mode.
You can use Test Mode by going Couriers -> Setup Couriers -> Courier Setup -> Yodel (Domestic or International) ->Test Mode
Setting up Yodel in One Stop Order Processing-
To be able to submit consignments to Yodel you need to setup the details for your account
Click here to setup Courier Rules
You are shown the details for each courier that you want to setup. Most of the details will be the same for each courier, for example, the default weights. However, each courier will have its own account number settings and maybe use a different printer.
Step 1 :Entering your Yodel credentials.
Setup the account with NetDespatch. A link is provided to create your account details.
If you make sure you select 1StopOrders as your Ecommerce System (so that they can setup your account to use our software correctly). Contact Yodel to open your Yodel via Netdespatch account
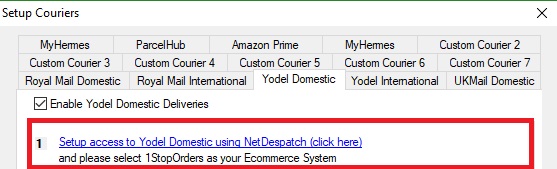
NOTE: NetDespatch do not charge you for using their services and your existing contract with the Courier is unaffected.
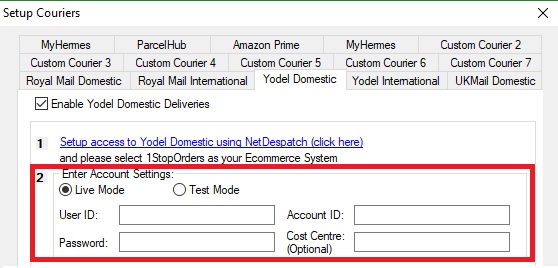
Step 2- Entering Account Settings-
Enter the account details emailed to you by NetDespatch. This will allow the consignments to be sent to the correct Courier account.
Step 3 - Default consignment information
By default the order item details are used to sent to the courier (mainly for international orders). However, you can override these details by providing values in these fields. You can use macros and formulae in each of these fields if you want to use different values for each order (more details on the macros to use are in the Invoice, Packing List and Purchase Order Options).
Step 4- Notifications
You can be notified about each stage of the creation and delivery process your consignments. You can additionally turn the notifications option off in your NetDespatch account settings.
Step 5- Print labels to:
You can choose which printer to send the labels to. It will use the default paper and margins etc. for the selected printer (E.g. a 6 by 4 label printer). If you are using Integrated Labels select No Printer - Do not print.
Available Services
By default, you are shown all the available services for the selected courier. If you want to only show the couriers that have been setup with your Courier account click on the Setup available services button.
Next to your printer selection, you can add available services to selected services depending on your needs, you can do this by selecting the available services on the left hand side and using the Add> button to move them to the Selected services side where they will then be available to use. If you would like to remove a service from your selected services you can use the <Remove button to place them back into the Available services list.
Adding new Royal Mail services to One Stop Order Processing
9. Save the file and restart OSOP. Then select the service in the courier options
Error when sending orders to Click and Drop, 'Error : The value in column 'Identifier (SKU)' is not unique in the order'
How to use print labels using Royal Mail Click and Drop with One Stop Order Processing
This guide shows you how to setup One Stop Order Processing with Royal Mail Click and Drop.
Once One Stop Order Processing has been setup to work with Royal Mail Click and Drop you will only have to tick orders and click on the Send to Courier button to print labels and retrieve tracking details. One Stop Order Processing can also automatically assign the correct Royal Mail service based on rules that can be automatically be run when orders are imported.
To complete the setup you will need to have an account with Royal Mail click and Drop, Click here to apply. It can take up to 48 hours to link your Royal Mail OBA account with your new click and drop account.
Downloading Click and Drop desktop
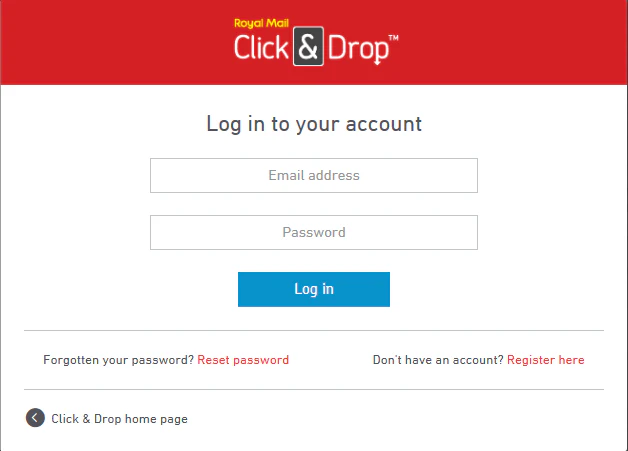
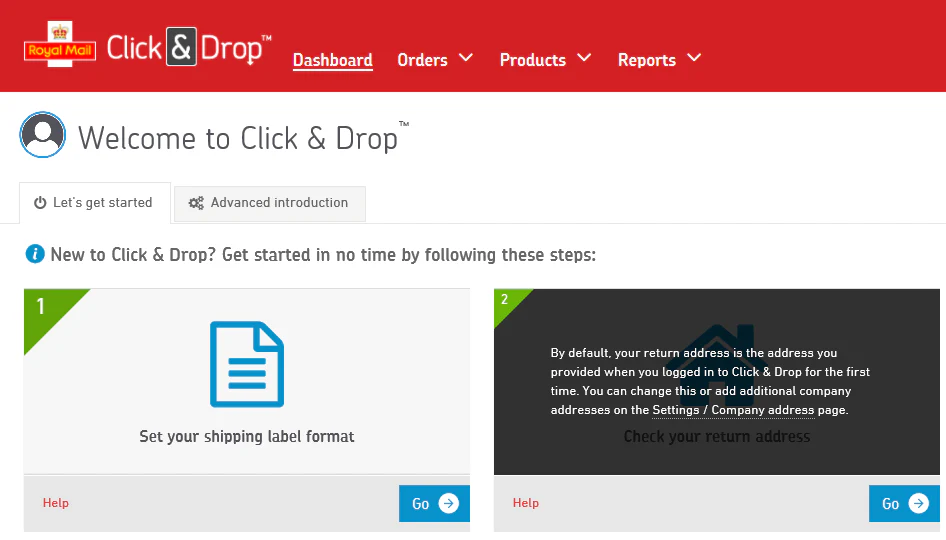
1 Login to your Click and Drop online account
2 Follow the menu option, Settings

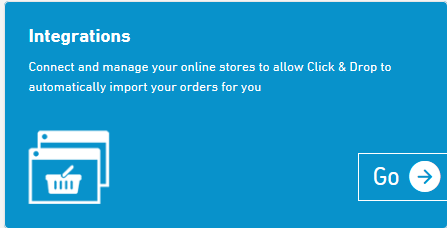
3 Click on Integrations
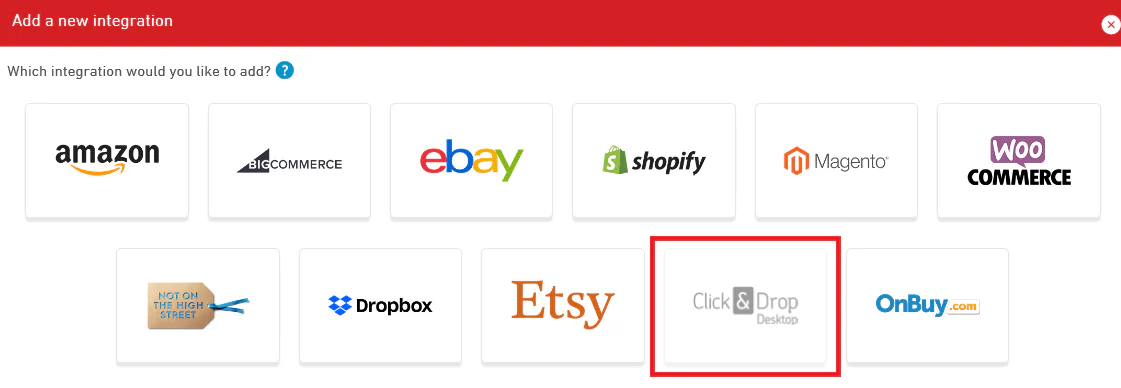
4 Click Add a new integration
![]()
5 Click and Drop Desktop
6 Download Click and Drop Desktop
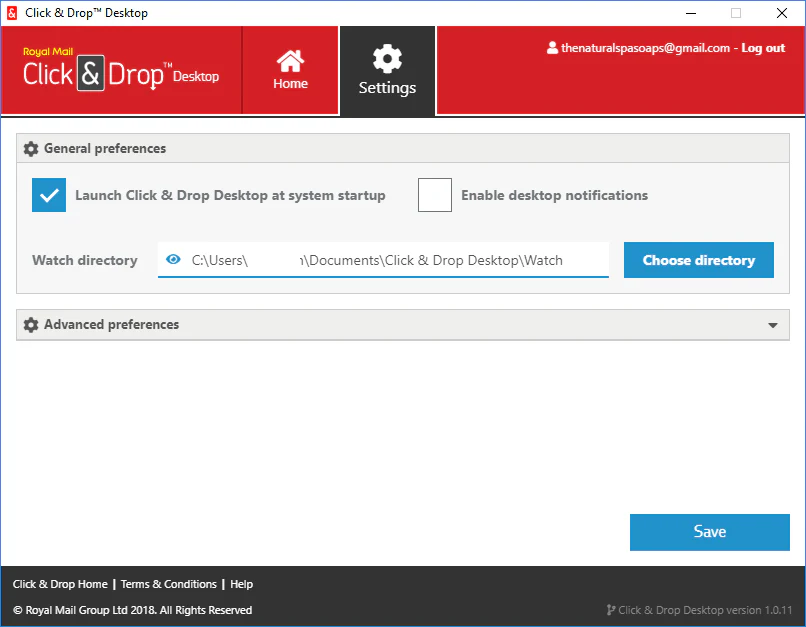
7 Open Click and Drop Desktop by double clicking on the icon in the task bar

8 Click Settings
9 Untick Enable Desktop Notifications, shown below
10 Go back to Click and Drop Online in your web browser, shown below
11 Click on settings

12 Click on Integrations
13 Select the Click & Drop Desktop Integration, example shown below


14 Tick Save a copy of labels to watch folder, shown below 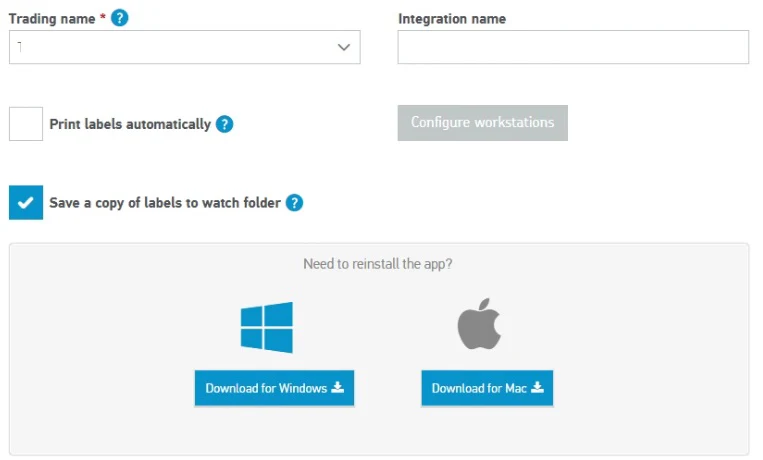
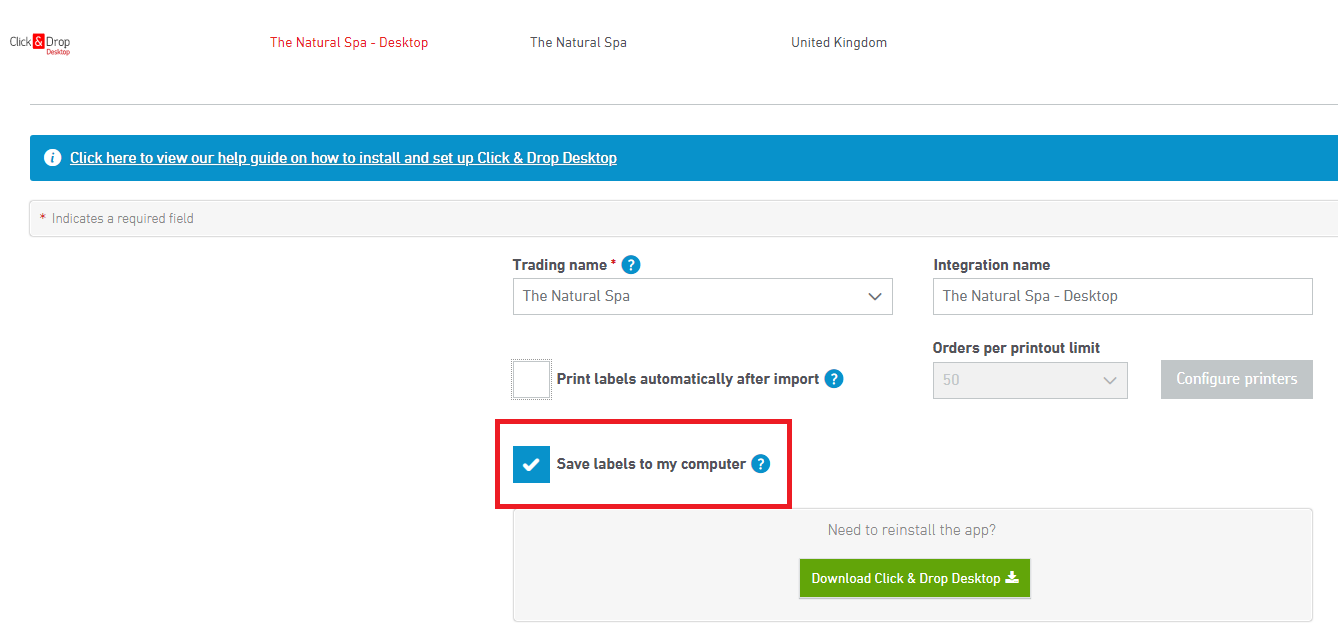 15 Click Update button at the bottom of the screen
16 Select the Miscellaneous option and tick the 'Mark order as despatched when label is generated' option, shown below: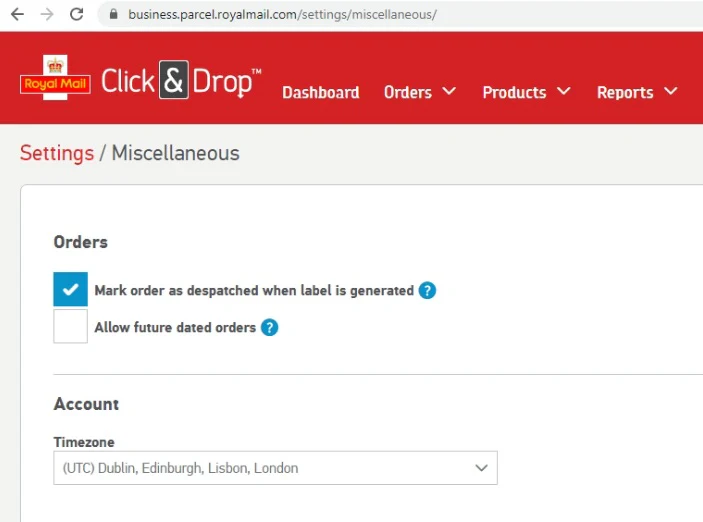
Setup One Stop Order Processing
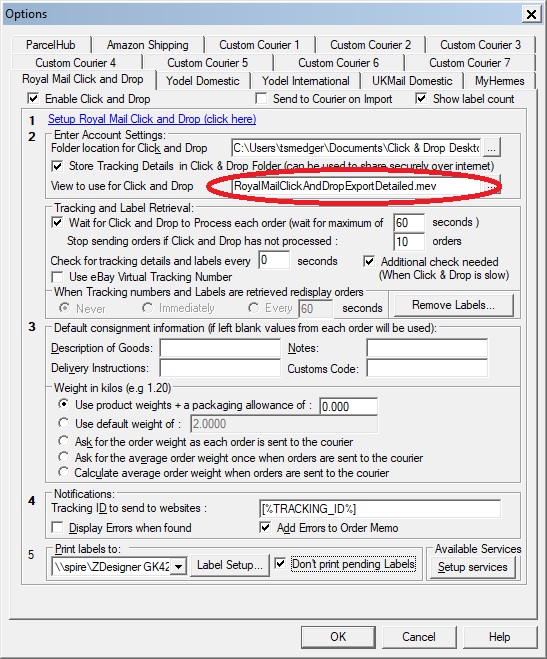
Configure Click and Drop Settings within One Stop Order Processing
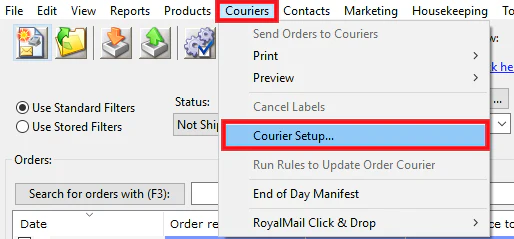
1 Follow the menu option Courier -> Courier Setup menu option, shown below
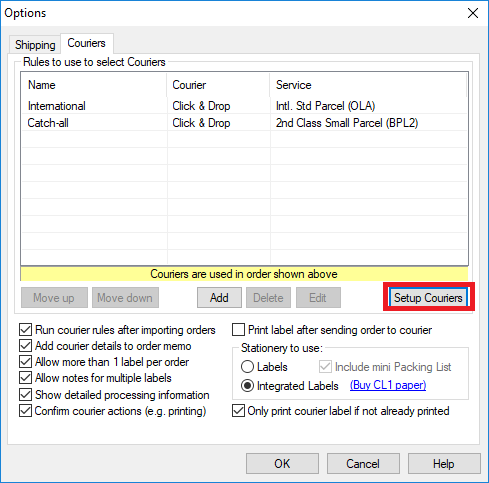
2 Click on the Setup Couriers button, shown below
3 Make sure the Royal Mail Click and Drop tab is selected

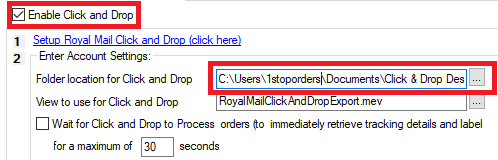
4 Make sure Enable Click and Drop is ticked
5 The folder location should default to the Click & Folder setup by Royal Mail Click and Drop Desktop. For example
C:\Users\1stoporders\Documents\Click & Drop Desktop\Watch
6 Make sure Wait for Click and Drop to process orders ... is ticked. This will automatically retrieve your tracking numbers and labels into One Stop Order Processing
7 Choose how Click and Drop uses each order's weight
8 Click Setup available services

9 Move any services that you use into the Selected Services column
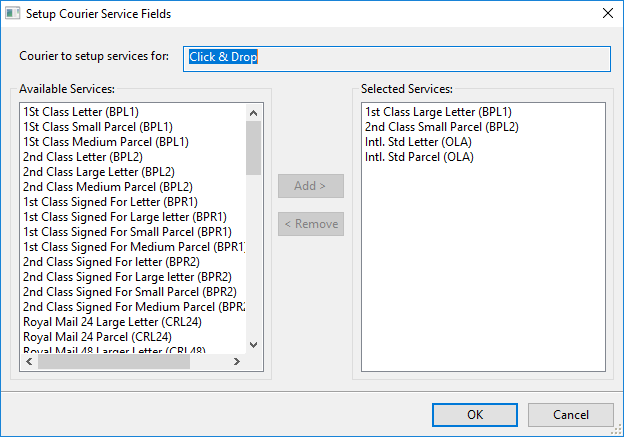
10 Click Ok to save your changes
Automatically assign Royal Mail services to orders
One Stop Order Processing can choose the services for you based on rules. Alternatively, you can select couriers and services manually as you process orders. The rules can be automatically run whenever orders are imported
For more information on how to setup rules click here
Configuring Royal Mail Click and Drop to process orders from One Stop Order Processing
1 Tick a sample order that has the service assigned.
![]()
2 Click Send to courier
![]()
3 Go to Click and Drop Online in your web browser
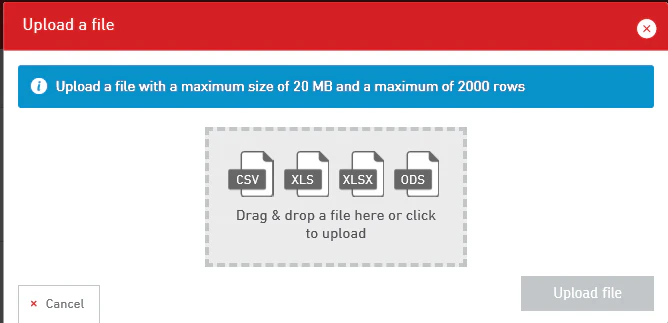
4 Follow the menu option Orders -> Import menu option, shown below
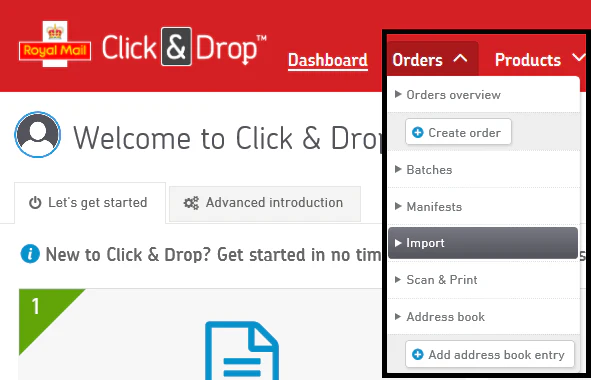
5 Upload your sample file, this will be saved in your watch directory, by default, this will be the \Documents\Click & Drop Desktop\Watch folder
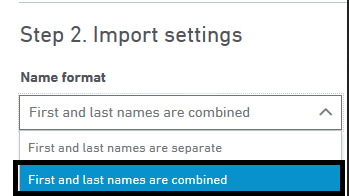
6 Choose First and last names are combined from the drop down bar, shown below
7 Map your headers to the equivalent header in Royal Mail Click and Drop. The names of the headers in the file generated by One Stop Order Processing will match the same names in Royal Mail Click and Drop
8 Click Import
9 Once imported correctly you need to delete this order. Any future orders will automatically be imported correctly by Royal Mail Click and Drop. You won't have to remap the orders.
Generating your Royal Mail Click and Drop labels
Once the Royal Mail Click and Drop integration is setup you only have to tick orders and click on the Send to Courier button to create labels for your orders. You can configure One Stop Order Processing to automatically print labels after sending labels to Royal Mail Click and Drop (click here for more details on how to set this up).1 Tick your orders ( making sure your new courier rules have been run or you have manually applied the courier and service code)
![]()
2 Click Send to Courier
![]()
NOTE : All tracking numbers and labels produced will be automatically pulled back into One Stop Order Processing. Then when you mark your orders as shipped this will be passed back to your selling platforms and labels printed directly to your 6 x 4 label printer or Integrated Label Paper.