Creating labels with RoyalMail Despatch Express for your Ebay, Amazon, SellerDeck, Shopify, Magento, osCommerce, BigCommerce, RomanCart, eBid, XCart, Oxatis, Groupon, Wowcher, Paypal, Cdiscount. ekmpowershop, Etsy, Flubit, OpenCart, PinnacleCart, PrestaShop, WooCommerce, Weebly, ChannelAdvisor, ASOS Marketplace, OnBuy, Mighty Deals , Mail Order and Telephone Sales
This feature is available in Professional, Premium and Enterprise versions of One Stop Order Processing
If you use the
Royal Mail's Despatch Express Software system you can use One Stop
Order Processing to print all of the selected orders' labels. You can also
import the tracking details (created by Despatch Express) back into One Stop
Order Processing, which can then be included in customer emails (or printed
on invoices etc.).
To do this use the following procedure:
You can get more information on One Stop Order Processing from the following
link:
https://www.1stoporders.co.uk
Printing Despatch Express (Royal Mail) labels
Using
One Stop Order Processing
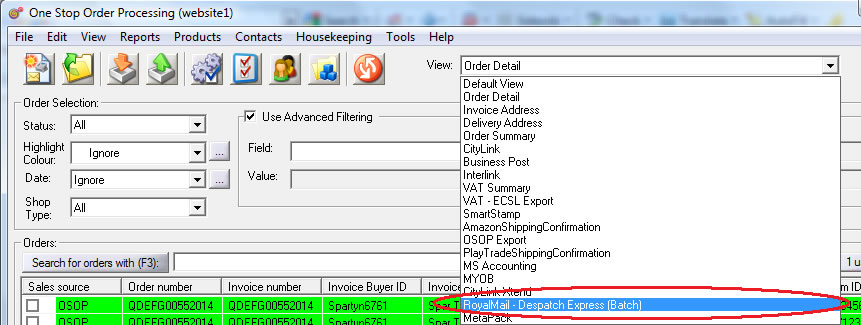
1 Select the Despatch Express view. If this is not available this is
installed into the installation directory (e.g. C:\OSOP\Main). The view
displays more columns that will be exported to Despatch Express (for example,
Items Shipped). These are used to find order information (or for filtering).
These columns are not exported.

2 Amend the view (using the View->Customize current view menu option
or the  button).
3 You should
amend the value of the Account Number field. If you have an account number enter
this here. You can leave this field blank if you only have 1 account number.
To change others see the Advanced settings section.
4
Select the orders to print labels for. You can either export all the displayed
orders or all the selected orders.
5 Press
the Export Orders button ( ) and select RoyalMail - Despatch Express (Batch).
6 The orders
will be exported, by default, to C:\OSOP\DespatchExpress.dat. You can change the filename by selecting the View->Change Export Options menu option or click on the button to the right of the View selection field ( ).
).
Using
Despatch Express
7Once the file has been created you should start Despatch Express.
Select the Despatch / Batch Import menu option.
8 Select the file exported by One Stop Order Processing and click on Import.
Importing the RoyalMail Tracking details
into One Stop Order Processing
1 Once you have created your RoyalMail labels, using Despatch Express,
export the details to a file (for example C:\OSOP\DespatchExpressDetails.csv)
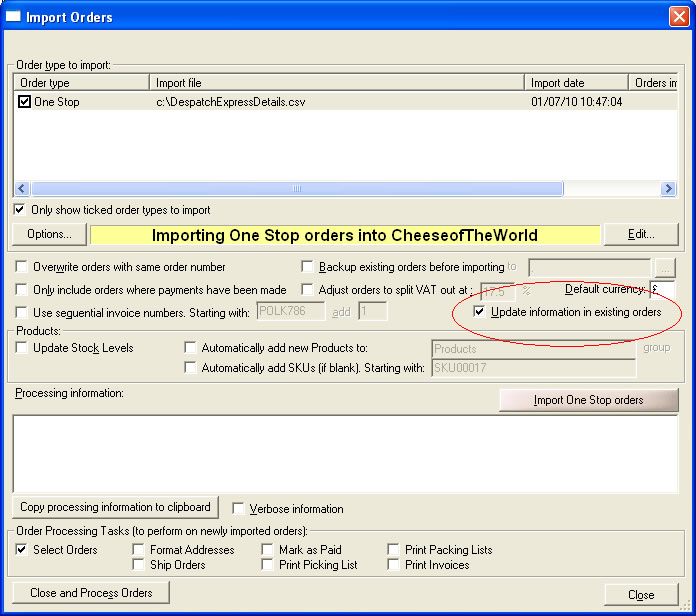
2 Using One Stop Order Processing select the Import orders button
( ).
).
3 Select the One Stop Order type and tick Update information
in existing orders. This is shown below.

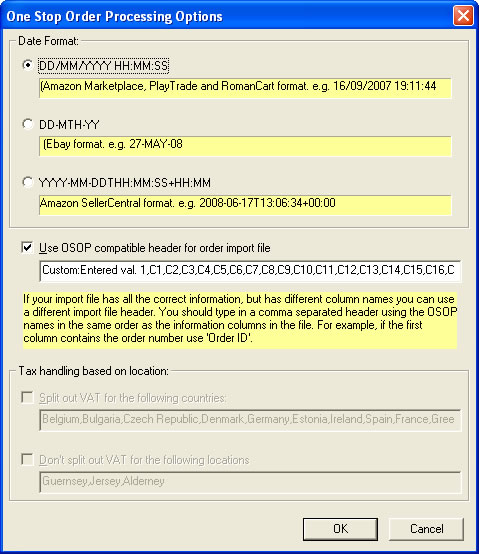
4 Click on the Options button. This displays the following dialog.

5 Tick the Use OSOP compatible header for order import file and
enter a value of
Custom:Entered val. 1,C1,C2,C3,C4,C5,C6,C7,C8,C9,C10,C11,C12,C13,C14,C15,C16,C17,C18,C18,C19,C20,Order
ID,C21,C22,C23,C24,C25,C26,C27,C28,C29,C30,C31,C32,C33,C34,C35
NOTE: The above maybe shown over 2 lines but include all the text starting
with Custom and ending with C35
(on a single line).
This will map the relevant fields from the Despatch Express export to
the One Stop Order Processing fields.
6 Click on OK.
7 When you import the order details (by clicking on Import One Stop
orders) the Custom field value will be updated with the tracking ID.
8 You can see the tracking value by viewing an order and looking at the
Custom values tab. It will be in the top right hand corner value of the
Custom values dialog. To use this value in an email or invoice use the
following macro:
[%CUSTOM_ENTERED1%]
9 If you want to import the tracking details into a different order field
use the relevant field name from the following link:
OneStopOrderProcessingOrders.html
and in the above header line (in 5) change
Custom:Entered val. 1
for the new field name.
10 To include this value in emails or invoices etc. use the related value
from the following link:
1StopOrdersDefRO.html
For example, to import the tracking ID into the order's Shipping instructions
field use the values Delivery Instructions (in 5) and [%DELIVERY_INSTRUCTIONS%]
in emails etc..
Advanced
settings
The default settings are for the number of labels to be printed as 1 using a
1st Class Packet Post service.
You can amend any of the default values by amending either the default view
settings, or if it is per order in the custom values on the required order.
DE-ServiceID
The following values can be used in the used as the default value or entered
on each order
| Code
to enter |
Meaning |
| SD101 |
Special
Delivery Next Day £500 |
| SD201 |
Special
Delivery Next Day £1000 |
| SD301
|
Special
Delivery Next Day £2500 |
| SD401 |
Special
Delivery 9am £50 |
| SD501 |
Special
Delivery 9am £1000 |
| SD601
|
Special
Delivery 9am £2500 |
| TP201 |
Royal
Mail Tracked |
| STL01 |
Standard
Tariff Letters 1st & 2nd |
| CRL01 |
Packet
Post Daily Rate 1st Class |
| CRL02 |
Packet
Post Daily Rate 2nd Class |
| FS101 |
Packetsort
8 1st Class Flat Rate Large Letter |
| FS201 |
Packetsort
8 2nd Class Flat Rate Large Letter |
| PK101 |
Packetsort
8 1st Class Flat Rate Packets |
| PK201 |
Packetsort
8 2nd Class Flat Rate Packets |
| PK301 |
Packetsort
8 1st Class Daily Rate |
| PK401 |
Packetsort
8 2nd Class Daily Rate |
| PPF01 |
Packetpost
Flat Rate 1st Class |
| PPF02 |
Packetpost
Flat Rate 2nd Class |
| OLA01 |
Overseas
Letters Airmail |
| OLS01
|
Overseas
Letters Surface |
| MP101 |
International
Contract Airsure |
| OF101 |
International
Format Sort Priority |
| OF301 |
International
Format Sort Economy |
| OZ101 |
International
Zone Sort Priority |
| OZ301 |
International
Zone Sort Economy |
You can also use
calculations based upon the order values to use different values for fields.
For example, setting the default value of DE-ServiceID to the following
[%Total P&P%][<]3.5[CRL01][CRL02]
means use CRL01
(Packet Post 1st Class) if p&p is£ < 3.5 otherwise use CRL02 2nd
class.
If you have 3 or
more shipping conditions you use the following approach. Using an example defined
in the following table:
| Shipping
Method |
Despatch
Express Code |
| Royal Mail
1st Class Post |
STL01 |
| Next Day
UK Delivery, Mon - Sat |
SD101 |
| Airmail |
OLA01 |
You need to define
a column for each value. Using Custom Fixed Values. In this example, values
18, 19 and 20. You should untick Include in Exported information for
each of these fields.
Define the values
as in the following table.
| Custom
Value |
Default
field value |
| [%Custom:Fixed
val. 18%] |
[%Shipping
method%][=]Royal Mail 1st Class Post[STL01] |
| [%Custom:Fixed
val. 19%] |
[%Shipping
method%][=]RNext Day UK Delivery, Mon - Sat [SD101] |
| [%Custom:Fixed
val. 20%] |
[%Shipping
method%][=]Airmail[OLA01] |
You then need to
put the value into the column to export (i.e. tick Include in Exported information).
Use another Custom value. In this example, [%Custom:Fixed val. 21%].
define its Default field value as
[%Custom:Fixed val. 18%][%Custom:Fixed val. 19%][%Custom:Fixed val. 20%]
This will put in whichever value has been defined into a single field.
NOTE: You should untick Include in Exported information on the
[%Shipping method%] field as this is not required.
More complex
shipping models
If you ship using different methods based upon order value you can use the following
approach as shown in the following example:
Packages should be sent as described in the following table.
| Order
Value |
How
to send |
Despatch
Express method |
| Less
than £5 |
2nd
Class |
Service STL01
, Class 2 |
| £5
to £9.99 |
2nd
Class Recorded |
Service STL01
, Class 2 , Service Enhancement 11 |
| £10
to £19.99 |
1st
Class Recorded |
Service STL01
, Class 1 , Service Enhancement 11 |
| £20
and above |
Royal
Mail Tracked |
Service TP201 |
To do this you
should add the Grand Total to the view and untick Include in Exported
Information.
DE-ServiceID
Change the value to
[%Grand total%][<]20[STL01][TP201]
DE-Additional1
Change this value to
~~~~~
Add 3new fields (e.g. use Custom:Fixed
val. 31, Custom:Fixed val. 32
and Custom:Fixed
val. 33). Move these to after Labels
to Print and before DE-Additional1.
Call these new fields Service Enhancement and Class and Tracking Code.
Service Enhancement
Change the field value to
[%Grand total%][>]4.99[~[%Tracking Code%]][~]
Class
Change the field value to
[%Grand total%][<]10[2][1]
Tracking Code
Change the field value to
[%Grand total%][<]20[11]
Also untick Include in Exported information
Package weights
You can enter weights for some Despatch Express services. If you need to do
this amend the value of DE-Additional1 field and remove the first ~ from
the default value. Then add a field before the DE-Additional1 field to
will contain the weight. This can be a fixed weight or use the calculated weight.
If required you can display this is grammes (rather than kilos) by changing
the Field value to:
!!![*]1000
this will display
the value multiplied by 1000 (i.e. in grammes).
NOTE: You may need
to include some fields used in calculations in views. If you untick Include
in Exported information this field will not be exported.
For more information about Despatch Express you can see Royal Mail's
guide at:
ftp://ftp.royalmail.com/Downloads/public/ctf/rm/Despatch_Express_Interfacing_System.pdf

 ).
). 
