To change how the information is displayed or available to use for filters press the Select Columns button.
Views
You can define up to 20 views, each having your
own choice of fields. You can quickly and easily move between views. Several
pre-defined views are created during the installation. These can be amended
or new views created from them.
You can also share views with other users by exporting your own.
When you change views the current filter settings are saved. This means that each filter can have their own pre-configured filters. If you don?t want this feature untick the Store this view?s filter settings option. This will mean that when you change views the current filter will be applied to the orders within the new view (unless that field is not available in the new view).
New
You can create a new view. You can choose which
view to copy the fields from.
Delete
Any view can be deleted. You must always have at
least 1 view defined.
Rename
The name of any view can be changed.
Import
Several sample views are provided. These are installed
in the same directory as the main Order Processing for Actinic software.
NOTE: When you import view information this will overwrite any individual definitions for custom values that you have defined. Your individual views will not be affected.
Export
This will prompt you for a filename to save the information to. If you want to share information with other users save the view onto a main server and then import to the machine(s).
View options
You can set several options for each view,
Store this view's filter settings : Save the filter settings with the view so that orders are fitlered autoamtically when the view is selected
Ignore "No order for main line" settings : Tick this to show main order line for orders even when they are marked as dummy order lines in Actinic
Hide Cancelled Orders : Do not include orders that have had all of their order lines cancelled, note that order detail lines for a partly cancelled order will still be shown
Show adjustments : Include order adjustment lines in the results window (only relevant when you are showing order detail in the view.
Only include fully pad for orders : Exclude orders that have not be paid for or have only partially been paid for.
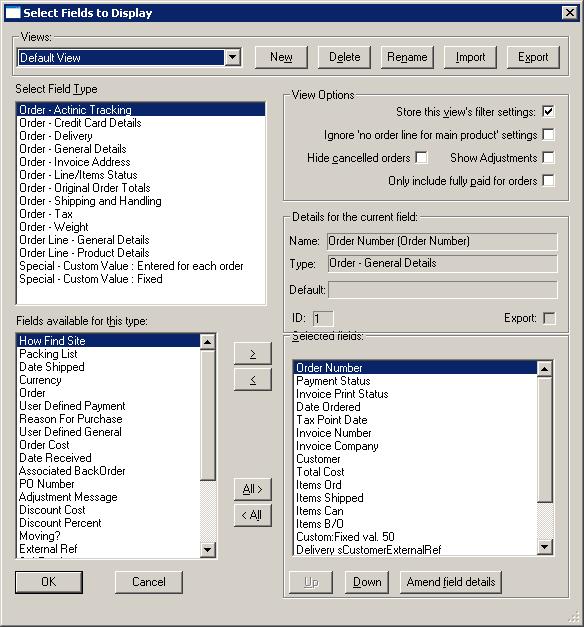
Adding fields to a view
Selected and Available fields
The right hand pane shows the current fields that
are displayed in the order browser. The select field type box, contains a list of field
categories, when you select these, the associated fields are shown in the list at
the bottom. To add fields to the Selected list select the required
field in the Available list and press the > button (or double
click the item to add). To add all the fields press the All> button.
The fields shown in the Available list are those not already selected
from the current list for the type selected.
To change the order of fields use the Up and Down buttons. If you want to remove any fields from the Selected list press the < button (or double click the item). To remove all items press the <All button.
Amend field details
You can also change the displayed name of any field.
This is the name that is displayed for the column heading and the field to filter
by. Click on the Amend field details button to display the dialog.
If you are using a non custom field you can apply the text in the Field value
to the end of the displayed field by putting !!!
at the start of the text. This can be used to use any of the functions and macros
(described below) on any displayed value. For example, entereing a value of
!!![U] will make the displayed
text UPPERCASE.
The details about the existing field are displayed:
| ID | This is the unique ID for this field. |
| Field name | The name to display for the column heading. If you want to use the original name click on the Use Original name button. |
| Field name | The name used is also the name used for the column heading in any exported file (if a header is chosen to be included). |
| Field value | This contains the default value to use for the field if it is blank. The default value can refer to any field. For example, delivery instructions. |
| Include in Exported Information | If you are going to export information you may not want to include
all the information displayed. This may be because the information is used
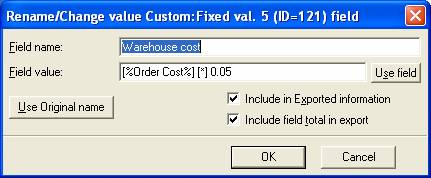
for data filtering, for example, Date ordered or it is used as part of the calculation fo other fields. For example, the export format must only show 80% of the order cost. The total order cost is displayed, but Include in Exported information is not ticked for it. The warehouse cost is calculated as 80% of the displayed order cost and Include in Exported information is ticked. |
| Include field | When this field is exported you can include the total of the column data in the information exported. |
| total in export | You must also tick the Include column totals after data option when exporting the data. |
Using default values
Using default values in fields allows you to create
your own analysis of your data and also extend the information displayed (or
exported).
There are two main uses for defaulting a value. You can use a default value if a field is blank. This applies to any field, an Actinic field or custom field. For example, delivery instructions.
The more common use of default values is when using custom fields (described in more detail later in this section). There are two types: the same value for all orders or a different value for each order.
You can default a value from 1 (or more) of the other fields displayed in your view. You can only use the fields displayed in your view. You can also perform calculations on items in the default value. You can use the following operators.
| [+] | The two values either side are added up | ||||
| [-] | The value to the right is taken away from the value on the left. | ||||
| [/] | The value on the left is divided by the value on the right. | ||||
| [*] | The two values are multiplied together. | ||||
| [<] |
Compares the value and if it is less than the value given value show
the first value otherwise show the second value. For example, to show Parcel Force for orders less than £100 and CityLink for orders over and including £100 use: [%Total Cost%] [<] 100 [Parcel Force] [CityLink] |
||||
| [>] |
Compares the value and if it is greater than the value given value show
the first value otherwise show the second value. For example, to alert someone (by adding text into a certain field) to check all orders over £200 use: [%Total Cost%] [>] 200 [Check Order] |
||||
| [=] |
Compares the value and if it equals value given value show the first
value otherwise show the second value. This can include text aswell as
numeric values. For example, to change the drop shipper depending upon a certain product use: [%Product Ref%] [=] IL42 [SmartShipper][We Ship] |
||||
| [U] |
Make the field UPPERCASE. You should put the opertaor after the field value. This can be useful for making certain fields more visible. For example, to make the Delivery company name UPPERCASE use: [%Delivery Company%] [U] |
||||
| [l] |
Make the field lowercase. You should put the opertaor after the field value.This can be useful for making certain fields more readable when joined with other fields. For example, to make the built up sentence (which is itself made up from other fields) more readable use: [%Text Words%][l] |
||||
| [$] |
Display a portion of a field. The 2 values following the operator are the position to start in the text followed by the number of characters to use. This can be useful when values have to be a fixed length for certain export functions or using certain characters in a value as a code to another system. For example, to use the first 3 characters of a product code as a warehouse location (or dropshipper) use the following. You can then base other fields on tests on this field. [%Product Ref%] [$][1][3] |
||||
| [.] | Take the absolute value of the number. For example, 19.21 would be shown as 19. This is very useful for any Inland Revenue figures where only the £ (GBP) number is required. | ||||
| [#] | Replace a letter or word with another word. This can be useful
if you wish to replace certain words (for branding) or to remove unwanted.
To replace the word Free with Additional use: [%Item title%][#][Free][Additional] To remove all commas from an address line: [%Invoice Address line 1%][#][,][] |
||||
| [D] | Display the date (if a date field) in the format YYYY-MM-DD.
This is useful when some export formats need the date in a different format. The formats supported are: 1 - yyyy-mm-dd 2 - dd/mm/yyyy 3 - dd/mm/yy 4 - mm/dd/yy If you use nothing or 1 after the [D] it will use the format YYYY-MM-DD. For example, to display the date as day/month/year use. [%Invoice Date%][D]2 |
||||
| [?] | Find a word within a field. If the text is found show the
first value otherwise the second value. For example, to look for the word
Fast in the shipping instructions use the following: [%Delivery Instructions%][?]Fast[UPS][DHL] This will display UPS if the word fast is used in the shipping instructions or DHL if it is not. This can be used to display order processing information based upon the order's choices. |
||||
| [I] | Display the ISO country code. If you use the default value
for the fields as !!![I] the country will be shown as the country ISO code. For example, United Kingdom will be displayed as UK. |
||||
| <!> | You can access the underlying data using SQL directly. You will need to know information about the underlying data. You can use the following values in the SQL to reference the current order being displayed:
For example, to show the product code on an order, without having to include the orderline, use the following. <!>select sItemID from TOrderLine where nOrderSeq={{ORD_ID}} You can use the other fields in the view as normal (in this example, [%Product Ref%]). You don't have to include the fields referenced in the SQL in the view if you are using their database names, |
You can also use numbers in calculations. For example, 4 or 512.6 or £3.1415926.
The example shown above is [%Order Cost%] [*] 0.05. This shows all values in the Warehouse cost field as 5% of the Total order cost. When you use calculations if either of the numbers uses your currency symbol (e.g. £) this will be used in the value displayed.
You can also perform calculations on fields which have other calculations performed on them. For example, another field, Warehouse VAT, maybe defined as [%Warehouse cost%] [*] 0.175. This will perform the calculation for the Warehouse cost before the WareHouse VAT. It does not matter the order that they appear in the view.
If you want the users of Order Processing for Actinic to be able
to enter a different value for each order use a Custom Value: Entered for
each order. They will enter the value in the Custom order details page.
Other Macros
{{TODAY}}
Today's date
{{TOMORROW}}
Tomorrow's date.
<ML>
If you put this value at the start of a default value this will make the current line also appear in product and order detail line item lines when exported. This is useful if you want to include additional information for exported product order lines where the field being exported in a custom value. For example, using a default value of <ML>[%Temp2LineNumber%] for a Custom Fixed field will also export this field for the product lines (where other fields of this type are exported).
XMLOPEN
When you are exporting the order details as XML you can specify new nodes (folders) by using the a default value of XMLOPEN. This will create a new Node with a name of the field. To specify the end of ths node's scope you should create a field with a default value of XMLCLOSE. Using this approach you can create a hierarchy within an XML file. You should use a Custom Fixed field for this entry.
XMLCLOSE
You MUST create a Custom Fixed field with a default value of XMLCLOSE when you want to close the XML node specified in the XMLOPEN field. The name of the field must be the same as the field name used in the XMLOPEN field. You MUST also close he last opened field given in the XMLOPEN field.
More ways to use fields
If you want users to be able to enter different
calculations for each order set the default value to include [+] 0. This tells once stop
Order Processing that any value entered may include calculations. If values
aren?t entered the default value will be 0. You can set the default value to
any number as long as it includes a sum (using [+], [-], [/] or [*]).
If you want the user to be able to enter other fields (from the view), for each order set the default value as a field. For example, [%Order Cost%]. If you are using this approach note that no validation is carried out and if the wrong field is entered a blank value is used.
If you are exporting to a 3rd party system and you require the exported file to have a number of empty fields set the default value for a custom value to contain the required number of empty items. For example, if the exported format requires a 255 values per line Comma Separated Value (CSV) file where the Actinic fields only occupy the first 120 values; create a default value for one of the custom values to be ,,,,,,,,,,,,,,,,,,,,,,,,,,,,,,,,,,,,. When exported the commas (,,,,,,,,,, ?) will be put onto the end of the existing output values.
Field Types
The field Types are the Actinic tables that
the information is taken from. When you select the Type the list of Available
fields changes in the Available pane.
If you want to show the details of each order line you should select entries from the Order Line/Item Status. This will then show 1 line in the display for each line of the order. For example, of an order has 5 items there are 5 lines shown for that item. When you come to perform an action on that order (e.g. Print an Invoice), however many items within the particular order are selected it will only print (or whatever action) that order once.
There are 2 additional field types:
Custom Value: Fixed
This allows you to enter up to 50 additional columns
to your views all having the same value. This value can be based upon another
field (or fields) and can include calculations. (Refer to the Amend field
details for more information on for more information on setting up these
values.). This field can be very useful for adding in required values for an
export file, where Actinic does not provide the relevant information.
The first 15 of these values are shown on the Custom values order detail page, but can?t be changed on that page. If you require the information to be shown in the order details you should make sure that the information is stored in one of the first 15 values.
Custom Value: Entered for each order
This type of field allows you to have a default
value (described in the previous Amend field details section) that can
be overridden, if required. You can create up to 50 of these values. If you
require the details to be amended on the custom values order details page you
should use one of the first 15 values. If you require more than 50 Fixed values
you can use these custom fields in the same way as the Fixed Custom values.
Field details
When you select a field on either the Available
or Selected lists the field?s details are shown. This information is used to
quickly identify the characteristics of a particular field. The following information
provided is shown below.
| Name | The actual name used and its default name. |
| Type | The Actinic type the field comes from (e.g. Order information). |
| Default Value | The default value applied to the field. |
| ID | The unique ID for the item. |
| Export | Will this be included in the exported information? |
Mole End Software - Part of the Mole End Group |
|||||
| Products, plugins and utilities for Actinic Desktop and SellerDeck | All your orders, from all your systems, all together in one simple-to-use application | Integrated label invoice paper and free software packages and templates. Print your invoice and labels at the same time | Print Amazon Despatch Notes with a peel out label with the customer's details on directly from Amazon | Integrated Label Paper in Bulk, by the pallet. In Stock and ready for Despatch. | Print Ebay Invoices with a peel out label with the customer's details on directly from Ebay |